# 路由
// 路由场景分析,中后台路由常见的常见如下:
1. 已获取 Token:
访问 /login:重定向到 /
访问 /login?redirect=/xxx:重定向到 /xxx
访问 /login以外的路由:直接访问 /xxx
2. 未获取 Token:
访问 /login:直接访问 /login
访问 /login 以外的路由:如访问 /dashboard,实际访问路径为 /login?redirect=%2Fdashboard,登录后会直接重定向 /dashboard
----------------------------------------------------------------------------------------------
// 路由源码
import './permission' // main.js 中加载了全局路由守卫
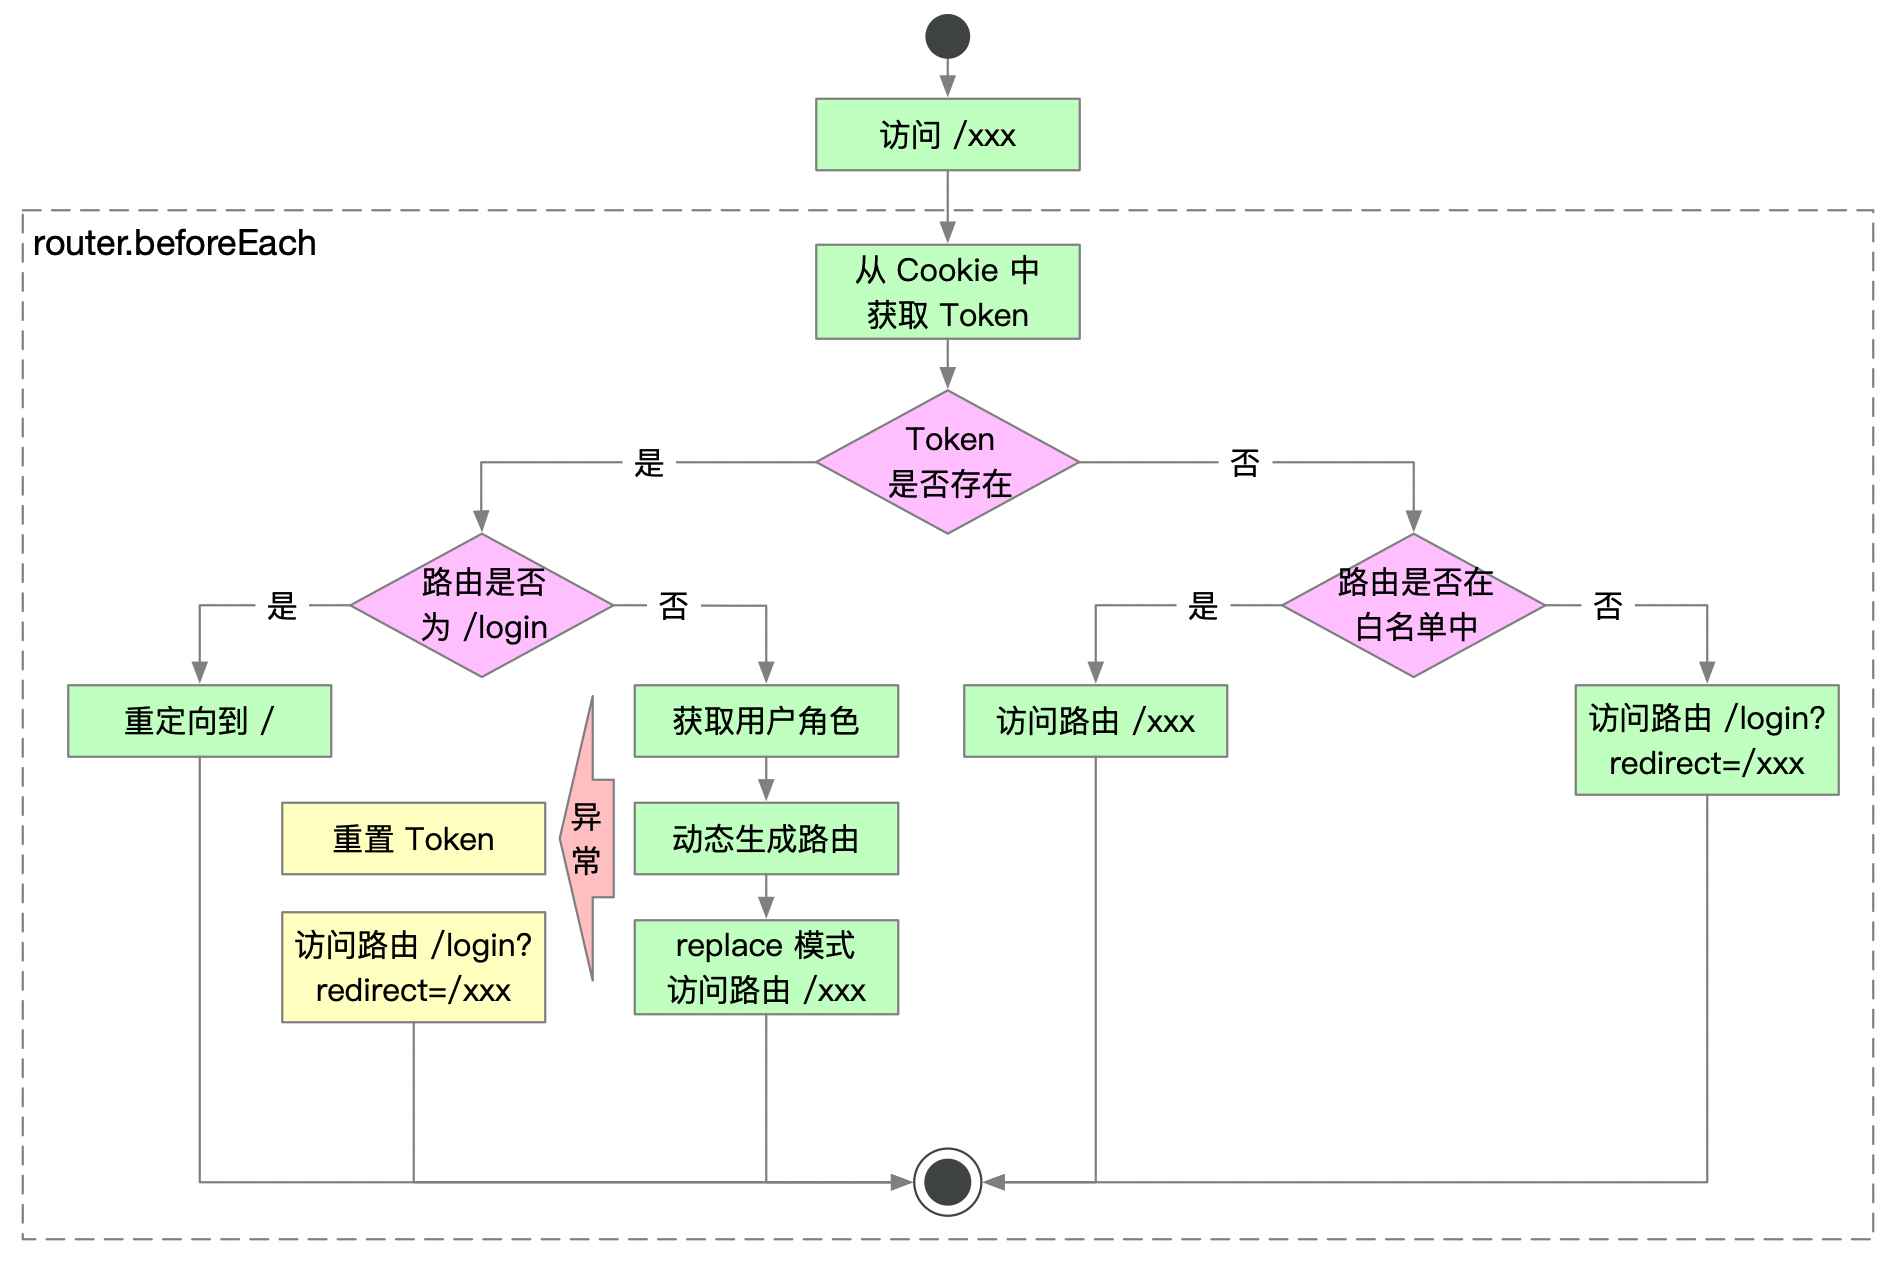
router.beforeEach(async(to, from, next) => { // permission 定义了全局路由守卫
// 启动进度条
NProgress.start()
// 修改页面标题
document.title = getPageTitle(to.meta.title)
// 从 Cookie 获取 Token
const hasToken = getToken()
// 判断 Token 是否存在
if (hasToken) {
// 如果当前路径为 login 则直接重定向至首页
if (to.path === '/login') {
next({ path: '/' })
NProgress.done()
} else {
// 判断用户的角色是否存在
const hasRoles = store.getters.roles && store.getters.roles.length > 0
// 如果用户角色存在,则直接访问
if (hasRoles) {
next()
} else {
try {
// 异步获取用户的角色
const { roles } = await store.dispatch('user/getInfo')
// 根据用户角色,动态生成路由
const accessRoutes = await store.dispatch('permission/generateRoutes', roles)
// 调用 router.addRoutes 动态添加路由
router.addRoutes(accessRoutes)
// 使用 replace 访问路由,不会在 history 中留下记录
next({ ...to, replace: true })
} catch (error) {
// 移除 Token 数据
await store.dispatch('user/resetToken')
// 显示错误提示
Message.error(error || 'Has Error')
// 重定向至登录页面
next(`/login?redirect=${to.path}`)
NProgress.done()
}
}
}
} else {
// 如果访问的 URL 在白名单中,则直接访问
if (whiteList.indexOf(to.path) !== -1) {
next()
} else {
// 如果访问的 URL 不在白名单中,则直接重定向到登录页面,并将访问的 URL 添加到 redirect 参数中
next(`/login?redirect=${to.path}`)
NProgress.done()
}
}
})
router.afterEach(() => {
// 停止进度条
NProgress.done()
})
----------------------------------------------------------------------------------------------
// 总结
1. 关于路由处理
vue-element-admin 对所有访问的路由进行拦截
访问路由时会从 Cookie 中获取 Token,判断 Token 是否存在
如果 Token 存在,将根据用户角色生成动态路由,然后访问路由,生成对应的页面组件。这里有一个特例,即用户访问 /login 时会重定向至 / 路由
如果 Token 不存在,则会判断路由是否在白名单中,如果在白名单中将直接访问,否则说明该路由需要登录才能访问,此时会将路由生成一个 redirect 参数传入 login 组件,实际访问的路由为:/login?redirect=/xxx
1
2
3
4
5
6
7
8
9
10
11
12
13
14
15
16
17
18
19
20
21
22
23
24
25
26
27
28
29
30
31
32
33
34
35
36
37
38
39
40
41
42
43
44
45
46
47
48
49
50
51
52
53
54
55
56
57
58
59
60
61
62
63
64
65
66
67
68
69
70
71
72
73
74
75
76
77
2
3
4
5
6
7
8
9
10
11
12
13
14
15
16
17
18
19
20
21
22
23
24
25
26
27
28
29
30
31
32
33
34
35
36
37
38
39
40
41
42
43
44
45
46
47
48
49
50
51
52
53
54
55
56
57
58
59
60
61
62
63
64
65
66
67
68
69
70
71
72
73
74
75
76
77
# 动态路由
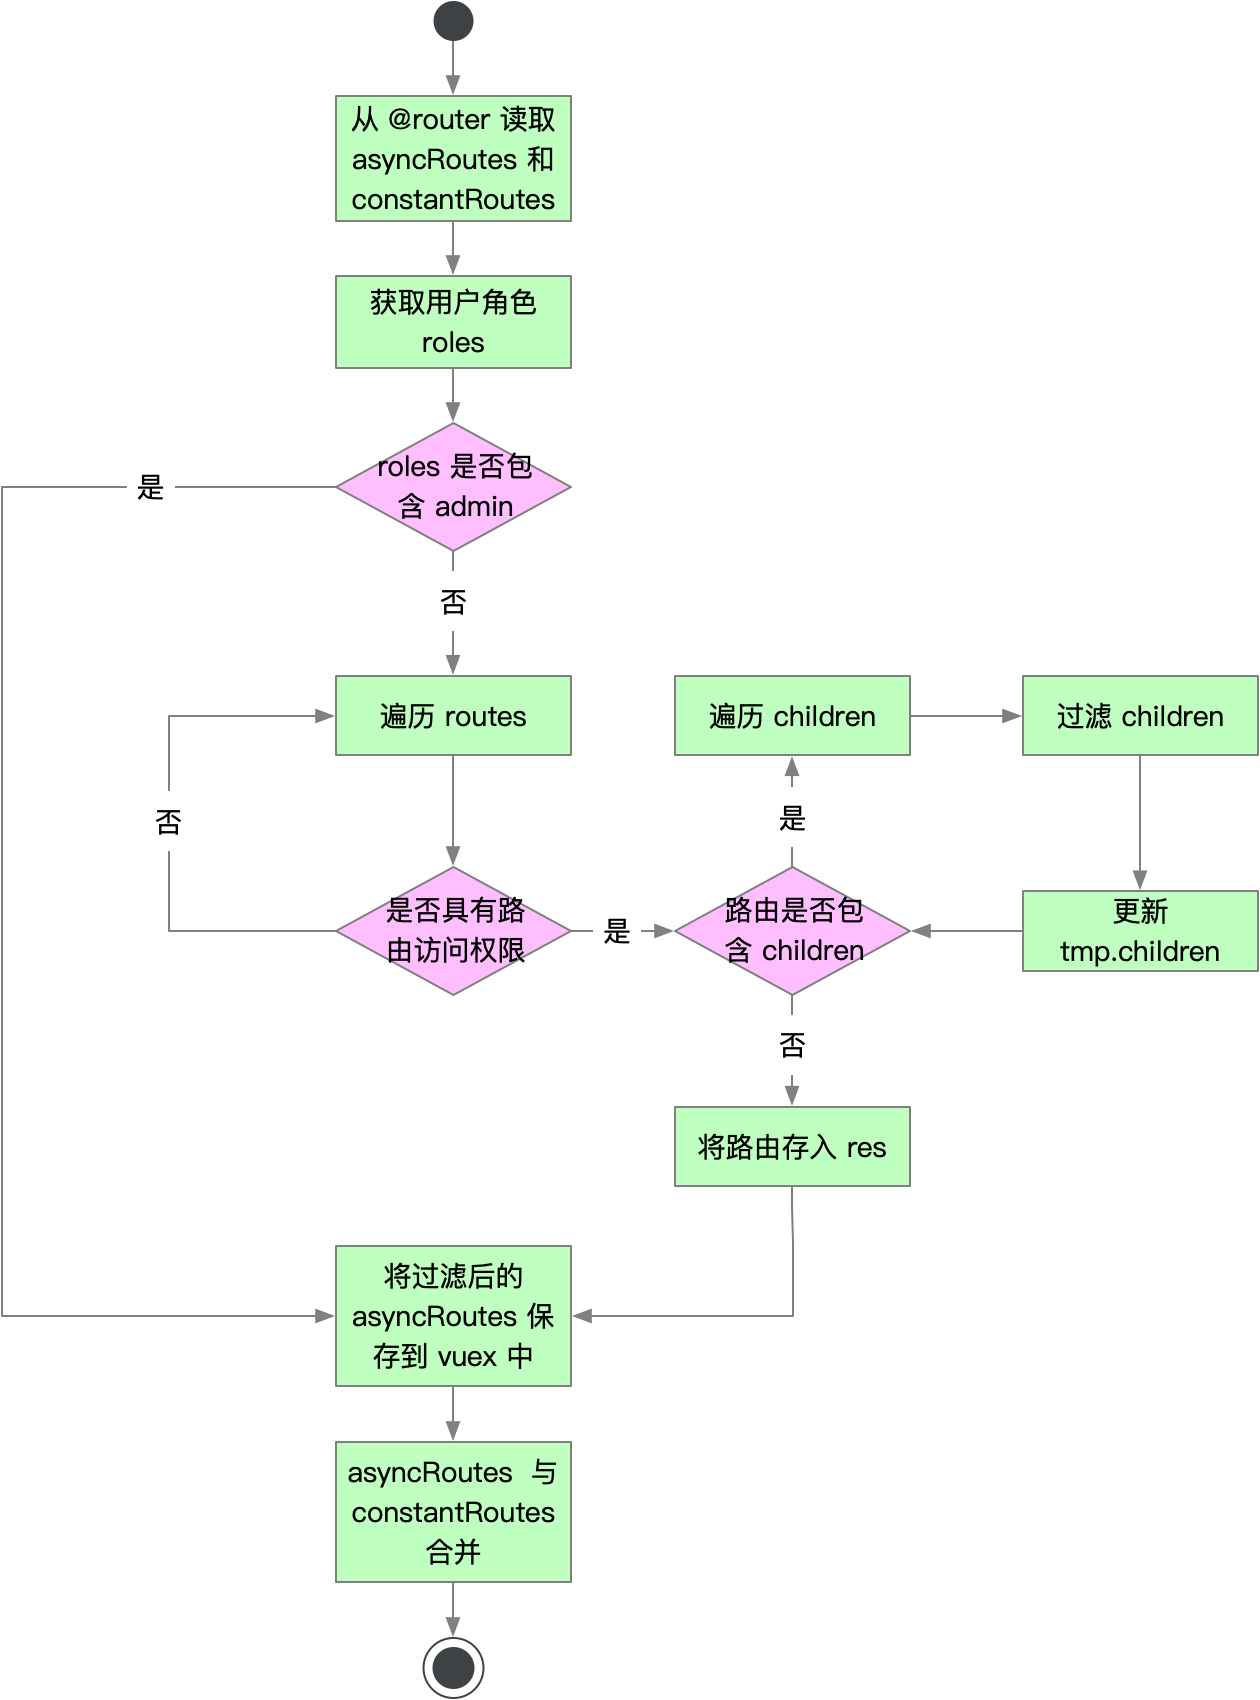
// 动态路由源码, 生成动态路由的源码位于 src/store/modules/permission.js 中的 generateRoutes 方法
import { asyncRoutes, constantRoutes } from '@/router'

generateRoutes({ commit }, roles) {
  // 返回 Promise 对象
  return new Promise(resolve => {
    let accessedRoutes
    if (roles.includes('admin')) {
      // 如果角色中包含 admin,则直接跳过判断,直接将 asyncRoutes 全部返回
      accessedRoutes = asyncRoutes || []
    } else {
      // 如果角色中没有包含 admin,则调用 filterAsyncRoutes 过滤路由
      accessedRoutes = filterAsyncRoutes(asyncRoutes, roles)
    }
    // 将路由保存到 vuex 中
    commit('SET_ROUTES', accessedRoutes)
    resolve(accessedRoutes)
  })
}
----------------------------------------------------------------------------------------------
// SET_ROUTES 方法
SET_ROUTES: (state, routes) => {
  // 将 routes 保存到 state 中的 addRoutes
  state.addRoutes = routes
  // 将 routes 集成到 src/router/index.js 的 constantRoutes 中
  state.routes = constantRoutes.concat(routes)
}
----------------------------------------------------------------------------------------------
// filterAsyncRoutes 方法, 路由过滤
export function filterAsyncRoutes(routes, roles) { // routes 是异步加载的路由, roles 是用户的角色,数组形式
  const res = []

  // 遍历全部路由
  routes.forEach(route => {
    // 对路由进行浅拷贝,注意 children 不会拷贝,因为不需要对 children 进行判断,所以可以使用浅拷贝
    const tmp = { ...route }
    // 检查用户角色是否具备访问路由的权限
    if (hasPermission(roles, tmp)) {
      // 当路由具有访问权限时,判断路由是否具备 children 属性
      if (tmp.children) {
        // 当路由包含 children 时,对 children 迭代调用 filterAsyncRoutes 方法
        tmp.children = filterAsyncRoutes(tmp.children, roles)
      }
      // 当路由具有访问权限时,将 tmp 保存到 res 中
      res.push(tmp)
    }
  })
  return res
}
----------------------------------------------------------------------------------------------
// hasPermission方法, 检查权限方法
function hasPermission(roles, route) {
  // 检查路由是否包含 meta 和 meta.roles 属性
  if (route.meta && route.meta.roles) {
    // 判断 route.meta.roles 中是否包含用户角色 roles 中的任何一个权限,如果包含则返回 true,否则为 false
    return roles.some(role => route.meta.roles.includes(role))
  } else {
    // 如果路由没有 meta 或 meta.roles 属性,则视为该路由不需要进行权限控制,所有用户对该路由都具有访问权限
    return true
  }
}
----------------------------------------------------------------------------------------------
// 总结
1. 关于动态路由和权限校验
    vue-element-admin 将路由分为:constantRoutes 和 asyncRoutes
    用户登录系统时,会动态生成路由,其中 constantRoutes 必然包含,asyncRoutes 会进行过滤
    asyncRoutes 过滤的逻辑是看路由下是否包含 meta 和 meta.roles 属性,如果没有该属性,所以这是一个通用路由,不需要进行权限校验;如果包含 roles 属性则会判断用户的角色是否命中路由中的任意一个权限,如果命中,则将路由保存下来,如果未命中,则直接将该路由舍弃
    asyncRoutes 处理完毕后,会和 constantRoutes 合并为一个新的路由对象,并保存到 vuex 的 permission/routes 中
    用户登录系统后,侧边栏会从 vuex 中获取 state.permission.routes,根据该路由动态渲染用户菜单
1
2
3
4
5
6
7
8
9
10
11
12
13
14
15
16
17
18
19
20
21
22
23
24
25
26
27
28
29
30
31
32
33
34
35
36
37
38
39
40
41
42
43
44
45
46
47
48
49
50
51
52
53
54
55
56
57
58
59
60
61
62
63
64
65
66
67
68
69
2
3
4
5
6
7
8
9
10
11
12
13
14
15
16
17
18
19
20
21
22
23
24
25
26
27
28
29
30
31
32
33
34
35
36
37
38
39
40
41
42
43
44
45
46
47
48
49
50
51
52
53
54
55
56
57
58
59
60
61
62
63
64
65
66
67
68
69
# 侧边栏
// el-menu 用法解析,侧边栏的核心是将根据权限过滤后的 router 和 el-menu 组件进行映射,所以熟悉 el-menu 是理解 sidebar 的起点
<template>
  <el-row class="tac">
    <el-col :span="12">
      <el-menu
        default-active="1-1" // 激活的菜单,注意如果存在子菜单,需要填入子菜单 ID
        background-color="#545c64"
        text-color="#fff"
        active-text-color="#ffd04b"
        mode="vertical" // 枚举值,分为 vertical 和 horizontal 两种
        unique-opened // 是否保持一个菜单打开
        :collapse="isCollapse" // 是否水平折叠收起菜单(仅在 mode 为 vertical 时可用)
        :collapse-transition="false" // 是否显示折叠动画
        class="el-menu-vertical-demo"
        @open="handleOpen"
        @close="handleClose"
        @select="handleSelect"
      >
        <el-submenu index="1">
          <template slot="title">
            <i class="el-icon-location"></i>
            <span>导航一</span>
          </template>
          <el-menu-item-group>
            <template slot="title">分组一</template>
            <el-menu-item index="1-1">选项1</el-menu-item>
            <el-menu-item index="1-2">选项2</el-menu-item>
          </el-menu-item-group>
          <el-menu-item-group title="分组2">
            <el-menu-item index="1-3">选项3</el-menu-item>
          </el-menu-item-group>
          <el-submenu index="1-4">
            <template slot="title">选项4</template>
            <el-menu-item index="1-4-1">选项1</el-menu-item>
          </el-submenu>
        </el-submenu>
        <el-submenu index="2">
          <template slot="title">
            <i class="el-icon-menu"></i>
            <span slot="title">导航二</span>
          </template>
          <el-menu-item index="2-1">选项2-1</el-menu-item>
        </el-submenu>
        <el-menu-item index="3" disabled>
          <i class="el-icon-document"></i>
          <span slot="title">导航三</span>
        </el-menu-item>
        <el-menu-item index="4">
          <i class="el-icon-setting"></i>
          <span slot="title">导航四</span>
        </el-menu-item>
      </el-menu>
    </el-col>
    <el-col>
      <el-button @click="isCollapse = !isCollapse">折叠</el-button>
    </el-col>
  </el-row>
</template>

<script>
export default {
  data() {
    return {
      isCollapse: false
    }
  },
  methods: {
    // 点击菜单事件,keyPath 代表菜单的访问路径
    handleSelect(key, keyPath) {
      console.log('handleSelect', key, keyPath)
    },
    // 父菜单打开时触发事件
    handleOpen(key, keyPath) {
      console.log('handleOpen', key, keyPath)
    },
    // 父菜单关闭时触发事件
    handleClose(key, keyPath) {
      console.log('handleClose', key, keyPath)
    }
  }
}
</script>
----------------------------------------------------------------------------------------------
// el-submenu,子菜单容器,el-submenu 与 el-menu 不同,el-menu 表示整个菜单,而 el-submenu 表示一个具体菜单,只是该菜单还包含了子菜单
<el-submenu index="1">
    <template slot="title">
      <i class="el-icon-location"></i>
      <span>导航一</span>
    </template>
</el-submenu>
----------------------------------------------------------------------------------------------
1. el-submenu 容器内 default 的 slot 用来存放子菜单,可以包含三种子菜单组件:
    el-menu-item-group //菜单分组,为一组菜单添加一个标题,el-menu-item-group 容器内容需要存放 el-menu-item 组件,支持通过 title 的 slot 来定制标题样式
    el-submenu // el-submenu 支持循环嵌套 el-submenu,这使得超过两级子组件得以实现
    el-menu-item // 子菜单组件
1
2
3
4
5
6
7
8
9
10
11
12
13
14
15
16
17
18
19
20
21
22
23
24
25
26
27
28
29
30
31
32
33
34
35
36
37
38
39
40
41
42
43
44
45
46
47
48
49
50
51
52
53
54
55
56
57
58
59
60
61
62
63
64
65
66
67
68
69
70
71
72
73
74
75
76
77
78
79
80
81
82
83
84
85
86
87
88
89
90
91
92
93
94
95
2
3
4
5
6
7
8
9
10
11
12
13
14
15
16
17
18
19
20
21
22
23
24
25
26
27
28
29
30
31
32
33
34
35
36
37
38
39
40
41
42
43
44
45
46
47
48
49
50
51
52
53
54
55
56
57
58
59
60
61
62
63
64
65
66
67
68
69
70
71
72
73
74
75
76
77
78
79
80
81
82
83
84
85
86
87
88
89
90
91
92
93
94
95
// sidebar源码位置
1. sidebar 引用自 layout 组件,layout 组件位于 src/layout/index.vue
2. sidebar 组件源码位于 src/layout/components/Sidebar/index.vue
----------------------------------------------------------------------------------------------
// sidebar源码分析
<template>
  <div :class="{'has-logo':showLogo}">
    <logo v-if="showLogo" :collapse="isCollapse" />
    <el-scrollbar wrap-class="scrollbar-wrapper">
      <el-menu
        :default-active="activeMenu"
        :collapse="isCollapse"
        :background-color="variables.menuBg"
        :text-color="variables.menuText"
        :unique-opened="false"
        :active-text-color="variables.menuActiveText"
        :collapse-transition="false"
        mode="vertical"
      >
        <sidebar-item v-for="route in permission_routes" :key="route.path" :item="route" :base-path="route.path" />
      </el-menu>
    </el-scrollbar>
  </div>
</template>

<script>
import { mapGetters } from 'vuex'
import Logo from './Logo'
import SidebarItem from './SidebarItem'
import variables from '@/styles/variables.scss'

export default {
  components: { SidebarItem, Logo },
  computed: {
    ...mapGetters([
      'permission_routes',
      'sidebar'
    ]),
    // activeMenu: 通过 meta.activeMenu 属性,指定路由对应的高亮菜单,meta.activeMenu 需要提供一个合法的路由,否则将不能生效
    activeMenu() {
      const route = this.$route
      const { meta, path } = route
      if (meta.activeMenu) {
        return meta.activeMenu
      }
      return path
    },
     // showLogo:判断 settings.js 中的配置项是否需要展示 Logo
    showLogo() {
      return this.$store.state.settings.sidebarLogo
    },
     // variables:从 @/styles/variables.scss 中获取 scss 对象,从而获取样式
    variables() {
      return variables
    },
     // isCollapse: NavBar 中点击按钮,会修改 Cookie 中的 sidebarStatus,从 vuex 取值时会将 sidebarStatus 转为 Boolean,并判断默认是否需要收缩左侧菜单栏
    isCollapse() {
      return !this.sidebar.opened
    }
  }
}
</script>
----------------------------------------------------------------------------------------------
// sidebar 中通过 sidebar-item 实现子菜单,下面我们来分析 sidebar-item 组件
<template>
  <div v-if="!item.hidden" class="menu-wrapper">
    <template v-if="hasOneShowingChild(item.children,item) && (!onlyOneChild.children||onlyOneChild.noShowingChildren)&&!item.alwaysShow">
      <app-link v-if="onlyOneChild.meta" :to="resolvePath(onlyOneChild.path)">
        <el-menu-item :index="resolvePath(onlyOneChild.path)" :class="{'submenu-title-noDropdown':!isNest}">
          <item :icon="onlyOneChild.meta.icon||(item.meta&&item.meta.icon)" :title="onlyOneChild.meta.title" />
        </el-menu-item>
      </app-link>
    </template>

    <el-submenu v-else ref="subMenu" :index="resolvePath(item.path)" popper-append-to-body>
      <template slot="title">
        <item v-if="item.meta" :icon="item.meta && item.meta.icon" :title="item.meta.title" />
      </template>
      <sidebar-item
        v-for="child in item.children"
        :key="child.path"
        :is-nest="true"
        :item="child"
        :base-path="resolvePath(child.path)"
        class="nest-menu"
      />
    </el-submenu>
  </div>
</template>

<script>
import path from 'path'
import { isExternal } from '@/utils/validate'
import Item from './Item'
import AppLink from './Link'
import FixiOSBug from './FixiOSBug'

export default {
  name: 'SidebarItem',
  components: { Item, AppLink },
  mixins: [FixiOSBug],
  props: {
    // route object
    // item:路由对象
    item: {
      type: Object,
      required: true
    },
    isNest: {
      type: Boolean,
      default: false
    },
    // basePath:路由路径
    basePath: {
      type: String,
      default: ''
    }
  },
  data() {
    // To fix https://github.com/PanJiaChen/vue-admin-template/issues/237
    // TODO: refactor with render function
    this.onlyOneChild = null
    return {}
  },
  methods: {
    hasOneShowingChild(children = [], parent) {
      const showingChildren = children.filter(item => {
        if (item.hidden) {
          return false
        } else {
          // Temp set(will be used if only has one showing child)
          this.onlyOneChild = item
          return true
        }
      })

      // When there is only one child router, the child router is displayed by default
      if (showingChildren.length === 1) {
        return true
      }

      // Show parent if there are no child router to display
      if (showingChildren.length === 0) {
        this.onlyOneChild = { ... parent, path: '', noShowingChildren: true }
        return true
      }

      return false
    },
    resolvePath(routePath) {
      if (isExternal(routePath)) {
        return routePath
      }
      if (isExternal(this.basePath)) {
        return this.basePath
      }
      return path.resolve(this.basePath, routePath)
    }
  }
}
</script>
----------------------------------------------------------------------------------------------
// sidebar-item 最重要是展示逻辑,主要分为以下几步:
1. 通过 item.hidden 控制菜单是否展示
2. 通过 hasOneShowingChild(item.children,item) && (!onlyOneChild.children||onlyOneChild.noShowingChildren)&&!item.alwaysShow
   逻辑判断template 菜单是否展示,template 代表单一菜单
3. hasOneShowingChild: 判断是否只有一个需要展示的子路由
4. !onlyOneChild.children||onlyOneChild.noShowingChildren:判断需要展示的子菜单,是否包含 children 属性,如果包含,则说明子菜单可能存在孙子菜单
   此时则需要再判断 noShowingChildren 属性
5. !item.alwaysShow:判断路由中是否存在 alwaysShow 属性,如果存在,则返回 false,不展示 template 菜单,也就说只要配置了 alwaysShow 属性
   就会直接进入 el-submenu 组件
----------------------------------------------------------------------------------------------
// hasOneShowingChild 方法源码详解
// children: router 对象的 children 属性
// item: router 对象
hasOneShowingChild(children = [], parent) {
  const showingChildren = children.filter(item => {
    // 如果 children 中的路由包含 hidden 属性,则返回 false
    if (item.hidden) {
      return false
    } else {
      // 将子路由赋值给 onlyOneChild,用于只包含一个路由时展示
      this.onlyOneChild = item
      return true
    }
  })

  // 如果过滤后,只包含展示一个路由,则返回 true
  if (showingChildren.length === 1) {
    return true
  }

  // 如果没有子路由需要展示,则将 onlyOneChild 的 path 设置空路由,并添加 noShowingChildren 属性,表示虽然有子路由,但是不需要展示子路由
  if (showingChildren.length === 0) {
    this.onlyOneChild = { ...parent, path: '', noShowingChildren: true }
    return true
  }

  // 返回 false,表示不需要展示子路由,或者超过一个需要展示的子路由
  return false
}
----------------------------------------------------------------------------------------------
1. 如果展示 template 组件,首先会展示 app-link 组件,然后是 el-menu-item,最里面嵌套的是 item 组件:
    item 组件需要路由 meta 中包含 title 和 icon 属性,否则将渲染内容为空的 vnode 对象
    <app-link v-if="onlyOneChild.meta" :to="resolvePath(onlyOneChild.path)">
      <el-menu-item :index="resolvePath(onlyOneChild.path)" :class="{'submenu-title-noDropdown':!isNest}">
        <item :icon="onlyOneChild.meta.icon||(item.meta&&item.meta.icon)" :title="onlyOneChild.meta.title" />
      </el-menu-item>
    </app-link>
2. 如果 template 菜单不展示,则展示 el-submenu 菜单,el-submenu 逻辑中采用了嵌套组件的做法,将 sidebar-item 嵌套在 el-submenu 中:
    <el-submenu v-else ref="subMenu" :index="resolvePath(item.path)" popper-append-to-body>
      <template slot="title">
        <item v-if="item.meta" :icon="item.meta && item.meta.icon" :title="item.meta.title" />
      </template>
      <sidebar-item
        v-for="child in item.children"
        :key="child.path"
        :is-nest="true"
        :item="child"
        :base-path="resolvePath(child.path)"
        class="nest-menu"
      />
    </el-submenu>
3. el-submenu 中的 sidebar-item 有两点区别:
    第一是传入 is-nest 参数
    第二是传入 base-path 参数
----------------------------------------------------------------------------------------------
// app-link 源码分析
// app-link 是一个动态组件,通过解析 to 参数,如果包含 http 前缀则变成一个 a 标签,否则变成一个 router-link 组件
<template>
  <!-- eslint-disable vue/require-component-is -->
  <component v-bind="linkProps(to)">
    <slot />
  </component>
</template>

<script>
import { isExternal } from '@/utils/validate'

export default {
  props: {
    to: {
      type: String,
      required: true
    }
  },
  methods: {
    linkProps(url) {
      if (isExternal(url)) {
        return {
          is: 'a',
          href: url,
          target: '_blank',
          rel: 'noopener'
        }
      }
      return {
        is: 'router-link',
        to: url
      }
    }
  }
}
</script>
----------------------------------------------------------------------------------------------
// isExternal 函数通过一个正则表达式匹配 http 链接
export function isExternal(path) {
  return /^(https?:|mailto:|tel:)/.test(path)
}
----------------------------------------------------------------------------------------------
// item 组件源码分析
// item 组件通过定义 render 函数完成组件渲染
<script>
export default {
  name: 'MenuItem',
  functional: true,
  props: {
    icon: {
      type: String,
      default: ''
    },
    title: {
      type: String,
      default: ''
    }
  },
  render(h, context) {
    const { icon, title } = context.props
    const vnodes = []

    if (icon) {
      vnodes.push(<svg-icon icon-class={icon}/>)
    }

    if (title) {
      vnodes.push(<span slot='title'>{(title)}</span>)
    }
    return vnodes
  }
}
</script>
----------------------------------------------------------------------------------------------
// 总结
1. sidebar:sidebar 主要包含 el-menu 容器组件,el-menu 中遍历 vuex 中的 routes,生成 sidebar-item 组件。sidebar 主要配置项如下:
    activeMenu:根据当前路由的 meta.activeMenu 属性控制侧边栏中高亮菜单
    isCollapse:根据 Cookie 的 sidebarStatus 控制侧边栏是否折叠
    variables:通过 @/styles/variables.scss 填充 el-menu 的基本样式
2. sidebar-item:sidebar-item 分为两部分:
    第一部分是当只需要展示一个 children 或者没有 children 时进行展示,展示的组件包括:
      app-link:动态组件,path 为链接时,显示为 a 标签,path 为路由时,显示为 router-link 组件
      el-menu-item:菜单项,当 sidebar-item 为非 nest 组件时,el-menu-item 会增加 submenu-title-noDropdown 的class
      item:el-menu-item 里的内容,主要是 icon 和 title,当 title 为空时,整个菜单项将不会展示
    第二部分是当 children 超过两项时进行展示,展示的组件包括:
      el-submenu:子菜单组件容器,用于嵌套子菜单组件
      sidebar-item:el-submenu 迭代嵌套了 sidebar-item 组件,在 sidebar-item 组件中有两点变化:
        设置 is-nest 属性为 true
        根据 child.path 生成了 base-path 属性传入 sidebar-item 组件
1
2
3
4
5
6
7
8
9
10
11
12
13
14
15
16
17
18
19
20
21
22
23
24
25
26
27
28
29
30
31
32
33
34
35
36
37
38
39
40
41
42
43
44
45
46
47
48
49
50
51
52
53
54
55
56
57
58
59
60
61
62
63
64
65
66
67
68
69
70
71
72
73
74
75
76
77
78
79
80
81
82
83
84
85
86
87
88
89
90
91
92
93
94
95
96
97
98
99
100
101
102
103
104
105
106
107
108
109
110
111
112
113
114
115
116
117
118
119
120
121
122
123
124
125
126
127
128
129
130
131
132
133
134
135
136
137
138
139
140
141
142
143
144
145
146
147
148
149
150
151
152
153
154
155
156
157
158
159
160
161
162
163
164
165
166
167
168
169
170
171
172
173
174
175
176
177
178
179
180
181
182
183
184
185
186
187
188
189
190
191
192
193
194
195
196
197
198
199
200
201
202
203
204
205
206
207
208
209
210
211
212
213
214
215
216
217
218
219
220
221
222
223
224
225
226
227
228
229
230
231
232
233
234
235
236
237
238
239
240
241
242
243
244
245
246
247
248
249
250
251
252
253
254
255
256
257
258
259
260
261
262
263
264
265
266
267
268
269
270
271
272
273
274
275
276
277
278
279
280
281
282
283
284
285
286
287
288
289
290
291
292
293
294
295
296
297
298
299
300
301
302
303
304
305
306
307
308
309
310
311
312
313
314
315
316
317
# 重定向
// 登录重定向
// login.vue 中对 $route 进行监听
watch: {
  $route: {
    handler: function(route) {
      const query = route.query
      if (query) {
        this.redirect = query.redirect
        this.otherQuery = this.getOtherQuery(query)
      }
    },
    immediate: true
  }
}
// this.getOtherQuery(query) 的用途是获取除 redirect 外的其他查询条件,登录成功后
this.$store.dispatch('user/login', this.loginForm)
.then(() => {
  this.$router.push({ path: this.redirect || '/', query: this.otherQuery })
  this.loading = false
})
.catch(() => {
  this.loading = false
})
// 完成重定向的代码为
this.$router.push({ path: this.redirect || '/', query: this.otherQuery })
----------------------------------------------------------------------------------------------
// 重定向组件源码
<script>
export default {
  created() {
    const { params, query } = this.$route
    const { path } = params
    this.$router.replace({ path: '/' + path, query })
  },
  render: function(h) {
    return h() // avoid warning message
  }
}
</script>
// 重定向组件配置了动态路由
{
    path: '/redirect',
    component: Layout,
    hidden: true,
    children: [
      {
        path: '/redirect/:path*',
        component: () => import('@/views/redirect/index')
      }
    ]
}
// 细节
path: '/redirect/:path*' // 表示匹配零个或多个路由,比如路由为 /redirect 时,仍然能匹配到 redirect 组件
path: '/redirect/:path' // 此时路由 /redirect 将只能匹配到 Layout 组件,而无法匹配到 redirect 组件
1
2
3
4
5
6
7
8
9
10
11
12
13
14
15
16
17
18
19
20
21
22
23
24
25
26
27
28
29
30
31
32
33
34
35
36
37
38
39
40
41
42
43
44
45
46
47
48
49
50
51
52
53
54
2
3
4
5
6
7
8
9
10
11
12
13
14
15
16
17
18
19
20
21
22
23
24
25
26
27
28
29
30
31
32
33
34
35
36
37
38
39
40
41
42
43
44
45
46
47
48
49
50
51
52
53
54
# 面包屑导航
// el-breadcrumb-item
1. el-breadcrumb:面包屑导航容器,separator 控制面包屑导航文本中分割线
2. el-breadcrumb-item:面包屑子项目,可以使用 to 属性切换路由,slot 中可以包含 a 标签来跳转到外链
<el-breadcrumb separator="/">
  <el-breadcrumb-item :to="{ path: '/' }">首页</el-breadcrumb-item>
  <el-breadcrumb-item><a href="/">活动管理</a></el-breadcrumb-item>
  <el-breadcrumb-item>活动列表</el-breadcrumb-item>
  <el-breadcrumb-item>活动详情</el-breadcrumb-item>
</el-breadcrumb>
3. 使用 to 属性和 a 标签切换路由区别是:to 属性切换路由是动态替换 App.vue 中的路由内容,而 a 标签切换路由会刷新页面
----------------------------------------------------------------------------------------------
// 路由与面包屑导航映射
// 面包屑导航最大的难度在于如何将路由与面包屑导航进行映射,下面我们一起看看 vue-element-admin 如何实现
// 生成面包屑导航
getBreadcrumb() {
  let matched = this.$route.matched.filter(item => item.meta && item.meta.title)
  const first = matched[0]

  if (!this.isDashboard(first)) {
    matched = [{ path: '/dashboard', meta: { title: 'Dashboard' }}].concat(matched)
  }

  this.levelList = matched.filter(item => item.meta && item.meta.title && item.meta.breadcrumb !== false)
}
1. 获取 this.$route.matched,并过滤其中不包含 item.meta.title 的项,生成新的面包屑导航数组 matched
2. 判断 matched 第一项是否为 dashboard,如果不是,则添加 dashboard 为面包屑导航第一项
3. 再次过滤 matched 中 item.meta.title 为空的项和 item.meta.breadcrumb 为 false 的项
// isDashboard 实现如下
isDashboard(route) {
  const name = route && route.name
  if (!name) {
    return false
  }
  return name.trim().toLocaleLowerCase() === 'Dashboard'.toLocaleLowerCase()
}
----------------------------------------------------------------------------------------------
// 渲染面包屑导航
<el-breadcrumb class="app-breadcrumb" separator="/">
    <transition-group name="breadcrumb">
      <el-breadcrumb-item v-for="(item,index) in levelList" :key="item.path">
        <span v-if="item.redirect==='noRedirect'||index==levelList.length-1" class="no-redirect">{{ item.meta.title }}</span>
        <a v-else @click.prevent="handleLink(item)">{{ item.meta.title }}</a>
      </el-breadcrumb-item>
    </transition-group>
</el-breadcrumb>
----------------------------------------------------------------------------------------------
1. el-breadcrumb-item 内做了一个判断,如果是最后一个元素或者路由的 redirect 属性指定为 noRedirect 则不会生成链接
   否则将使用 a 标签生成链接,但是这里使用了 @click.prevent 阻止了默认 a 标签事件触发,而使用自定义的 handleLink 方法
   处理路由跳转,handleLink 方法源码如下
handleLink(item) {
  const { redirect, path } = item
  if (redirect) {
    this.$router.push(redirect)
    return
  }
  this.$router.push(this.pathCompile(path))
}
2. 这里的 pathCompile 用于解决动态路由的匹配问题
1
2
3
4
5
6
7
8
9
10
11
12
13
14
15
16
17
18
19
20
21
22
23
24
25
26
27
28
29
30
31
32
33
34
35
36
37
38
39
40
41
42
43
44
45
46
47
48
49
50
51
52
53
54
55
56
57
58
2
3
4
5
6
7
8
9
10
11
12
13
14
15
16
17
18
19
20
21
22
23
24
25
26
27
28
29
30
31
32
33
34
35
36
37
38
39
40
41
42
43
44
45
46
47
48
49
50
51
52
53
54
55
56
57
58
